Episode 8: Baruch Spinoza — The Ethics

This eighth Philosophical Minute example continues the analysis of Spinoza’s Ethics. The selected passage focuses on desire and its role in judgments of good and bad:
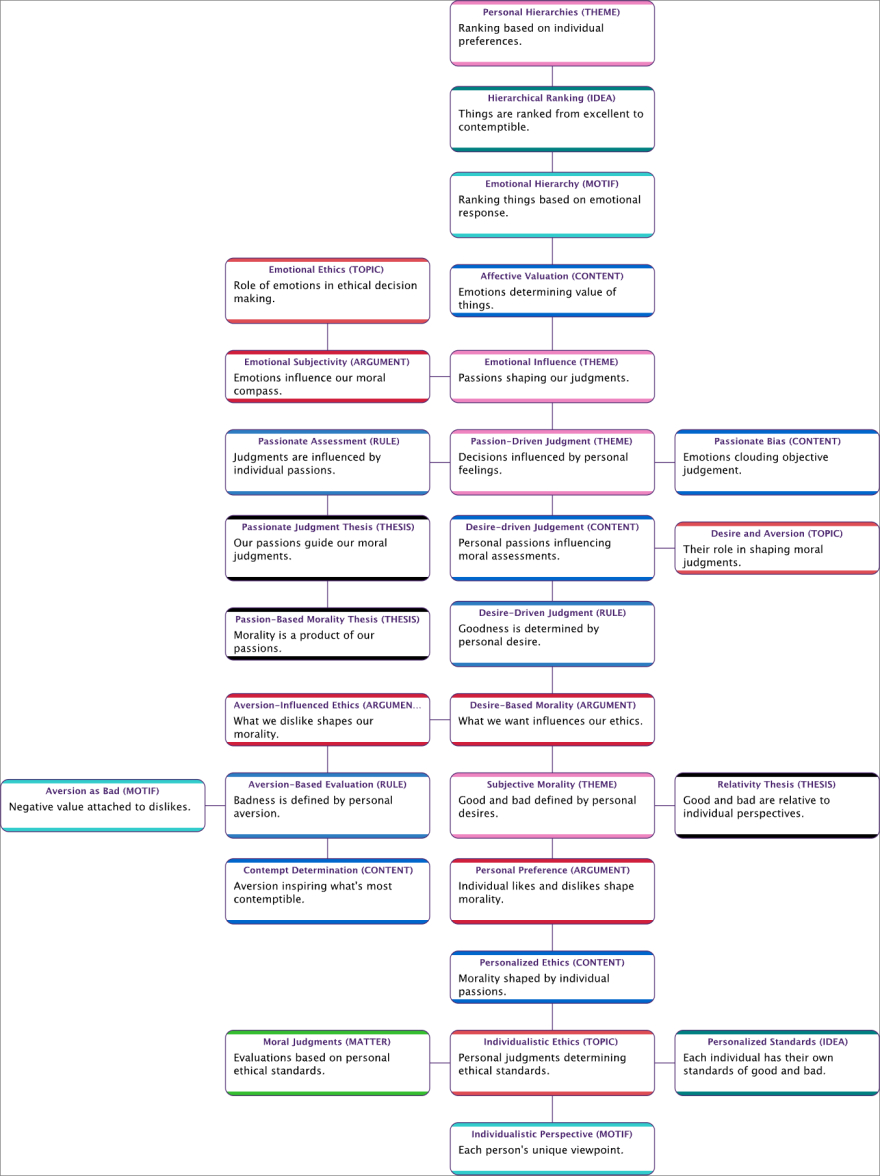
We consider good the thing that we desire; and consequently, we call the thing that inspires us with aversion, bad; so that everyone judges according to their passions what is good or bad, what is better or worse, what is most excellent or most contemptible.
The workflow uses Hellixia to extract keywords from the passage, generate embeddings, and build a network that represents the main concepts in the selected text.
Workflow for Creating a Network of Keywords
Start by generating a new node. Name it “Spinoza”.
Insert your chosen text excerpt into the comment section of this “Spinoza” node.
Use the Dimension Elicitor with the keyword “Keywords” to analyze the comment within the “Spinoza” node. Define the General Context as “Philosophy”. This context directs the elicitor to frame the analysis within the broader realm of philosophical discourse.
Evaluate the dimensions or keywords identified by Hellixia. Remove any that seem redundant or not pertinent to your objective.
Run the Embedding Generator for all the nodes that are still in play. This process translates the semantic elements of each node’s name and comments into quantifiable metrics.
Designate “Spinoza” as your primary or target node.
Launch the Naive Learning algorithm.
Alter the visual representation of every node to the “Badges” style. It ensures that the comments associated with each node are directly visible.
Transition your workspace to the Validation Mode F5.
Run the Arc Force analysis.
While still in the Arc Force analysis tool, run the Radial Layout. This method organizes nodes in a circle around your target node, positioning them based on the strength of their connection to the target.
Activate the Arc Comments. This feature superimposes a visualization layer on your network, displaying information about the arcs’ strengths.
Workflow for creating the Semantic Network
Start by copying the node “Spinoza”. Then, create a new graph and paste the node.
Utilize the Dimension Elicitor with the subsequent keywords: Arguments, Ideas, Matters, Milestones, Motifs, Rules, Themes, and the General Context set to “Philosophy”.
Inspect the dimensions returned by Hellixia and eliminate any that seem superfluous or unrelated to your analysis. Next, exclude the “Spinoza” node and run the Embedding Generator on all remaining nodes to apprehend the semantic associations of their names and comments.
Use the Maximum Weight Spanning Tree algorithm to generate a semantic network from the excerpt.
Change node styles to Badges to ensure each node’s comment is visible. Then, apply the Dynamic Grid Layout to position the nodes on your graph; bear in mind that this algorithm is not deterministic, and its orientation—vertical, horizontal, or mixed—is random. You might need to execute this layout several times to obtain an arrangement that aligns with your taste.
Switch over to Validation Mode F5 and select Skeleton View. Since your network doesn’t represent causal relations, Skeleton View will maintain only node connections without indicating a direction.
Workflow for the Node Force analysis
Switch back to Modeling Mode F4 and change the visual representation of each node to the “Discs” style. The disc style offers a clean and straightforward visual, which might be easier to interpret in some contexts compared to the badge style.
Use the Symmetric Layout tool.
Switch to Validation Mode F5 and run the Node Force analysis.
Workflow for creating the Hierarchical Semantic Network
This action will group similar variables together based on their semantic connections.
Open the Class Editor and run Class Description Generator to generate descriptive names for the factors in question. Use the Export Descriptions function, and save the newly created descriptions.
Switch back to Modeling Mode F4 and run Multiple Clustering to produce latent variables.
Launch the structural learning algorithm Taboo. Ensure the “Delete Unfixed Arcs” option is enabled.
Use the descriptions you exported earlier as a Dictionary to rename the latent variables you’ve created.
Switch to Validation and run Node Force.